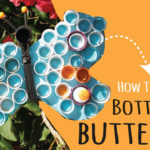
How to Make Toilet Paper Roll Wall Art – Butterflies & Flowers
We really enjoy making crafts with toilet paper rolls. In addition to upcycling what most people would consider trash, we created beautiful toilet paper roll wall art with ours. We created everything from ornate wreaths to cute butterflies & birds which we can hang or display in our room. We do want to mention we're super comfortable around a glue gun. If you have young children than swap the glue gun out for Mod Podge and start crafting!
The things you'll need to create your own toilet paper roll wall art is:
• Empty toilet paper rolls (The quantity really depends on the intricacy of your design. For example 1 butterfly = 1 toilet paper roll).
• 1 ruler (Optional you could also eyeball the cuts if you want).
• Scissors
• Paint
• Hot glue gun or Mod Podge.

Making toilet paper roll wall art was so fun and easy. We created some amazing pieces and you can too by simply following these steps:
- Flatten your toilet roll then measure 1" notches on each roll. We did it on the top and bottom of ours so we could get a nice even cut. Watch our video here for a guide.
- Using your 1" marks at the top and bottom, cut the roll from bottom mark to the top. Using our 1"measurement you should get 4 pieces from each roll.
- Grab your glue gun or Mod Podge and start gluing your toilet paper roll pieces together. Obviously the gluing technique will vary depending on what toilet paper wall art creation your making. Our video shows you how to make the butterfly.
- Once your wall art is glued together, PAINT! Use whatever color palette compliments your room.
- Let your wall art or sculpture dry, than hang or display and enjoy.
Although our video focuses on the butterfly wall art, we make that really cool looking wreath in the background from toilet paper rolls. Our dad could hardly believe it because it really did resemble iron work. Let your imagine run wild and HAVE FUN.